
|
Indian Journal of Dermatology, Venereology and Leprology
Medknow Publications on behalf of The Indian Association of Dermatologists, Venereologists and Leprologists (IADVL)
ISSN: 0378-6323 EISSN: 0973-3922
Vol. 74, Num. 5, 2008, pp. 527-531
|
Indian Journal of Dermatology, Venereology and Leprology, Vol. 74, No. 5, September-October, 2008, pp. 527-531
Residents Page
Improving diagnostic yield of punch biopsies of the skin
Khopkar Uday, Doshi Bhavana
Department of Dermatology, KEM Hospital and Seth GS Medical College, Mumbai
Correspondence Address:Department of Dermatology, 117, First Floor, Old OPD Block, KEM Hospital, Parel (E), Mumbai - 400 012
drkhopkar@gmail.com
Code Number: dv08233
Introduction
Doing a punch biopsy of the skin is one of the skills frequently expected of a first year resident in dermatology. However, once mastered, it can stand in good stead for the rest of her/his professional career. Punch biopsy is an apparently simple procedure but it has its own pitfalls. Being aware of the pitfalls and ways to work around them, helps in substantially improving the outcome of this diagnostic procedure.
Although there are more ways of doing a skin biopsy (viz. shave biopsy, excisional biopsy, and incisional biopsy), punch biopsy is the preferred method by dermatologists in India. This is because punch biopsy adequately samples the whole of the skin needed for diagnosis of inflammatory skin diseases. Like most biopsies, patient consent and anesthesia (usually lidocaine injected into the skin) are prerequisites.
Indications of punch biopsy [1]
- To establish a diagnosis of an inflammatory or neoplastic lesion. An important exception to this is when melanoma is suspected when an excision biopsy is preferred over other types. However, melanoma is extremely uncommon on the brown skin of Indians and hence, punch biopsy is commonly used for diagnosis of smaller neoplastic lesions by dermatologists in India. Another exception is when carcinoma is suspected to occur in the edge of a non-healing ulcer when multiple incisional biopsies are preferred. At most other times punch biopsy is better suited to reach a diagnosis.
- Combine diagnostic and therapeutic biopsy for a small single lesion like a solitary small verruca or molluscum contagiosum or a keratosis or even a small suspected basal cell carcinoma or actinic keratosis.
- Prognostic biopsy for assessing the effectiveness of a therapeutic intervention on a previously diagnosed disease e.g., effect of multibacillary therapy in leprosy or effect of treatment on lesions of mycosis fungoides.
Before biopsy
It is important to put some planning into a biopsy with respect to the timing, site/s and the number of punch biopsies.
- The need to take a biopsy must be established and discussed with the patient. In many instances, a biopsy serves the dual purpose of reaching the correct diagnosis and the correct treatment that follows from it. Even the less educated patients can understand the need for a correct diagnosis and should be explained the same in simple terms. Having the cooperation of the patient is vital not just while performing the biopsy but also for any follow up action.
- If appropriate lesion is not present, postpone the biopsy informing the patient about its necessity at a later date. This is particularly applicable to excoriated lesions which do not give diagnostic information due to non-specific changes of excoriation overshadowing the primary skin disease.
- If the case is complex or the suspected diagnosis is serious, it is better to consider taking two biopsies in the beginning. This obviates a tricky situation that can arise due to inconclusive biopsies when multiple types of skin lesions (polymorphic rash) are present or when there is known difficulty in establishing certain diagnoses e.g., patch stage mycosis fungoides. Another example is erythroderma when two biopsies are more likely to hit the target than a single biopsy. A patient convinced of the need to do biopsy is usually comfortable with two biopsies done at the beginning rather than go through the ordeal again after a couple of weeks.
Choice of lesion
- Always take a fully evolved, untreated lesion. However, if blisters are present, choose the smallest of vesicles and keep the roof intact. An exception to this rule is that when dermatitis herpetiformis is suspected, biopsy should be taken from a non-excoriated papule rather than a vesicle or a bulla. [2]
- Avoid excoriated or ulcerated lesions unless there is no option. As far as possible, try to find an unaltered primary lesion or wait for it to appear at next visit.
- For annular lesions such as granuloma annulare, porokeratosis or dermatophytosis, specimen from the advancing edge is most likely to give diagnostic information. For most other conditions, focus of maximal induration or elevation will usually give the best result. It is probably wise not to include normal skin in biopsy (important to remember when the edge is being biopsied) as this may be sectioned by the technician leading to a report of normal skin or "non-specific dermatitis". This is because when small punches like 3 or even 4 mm are used, it is not easy to appreciate the gross pathology of the specimen and the technician may inadvertently section the normal part of the skin.
Choice of site
- Avoid taking biopsy from the legs as stasis change can complicate its interpretation. Biopsies from the leg or foot show thickening of the small venules and capillaries in the superficial and deep plexuses with an apparent increase in their number. Besides, a sparse inflammatory infiltrate of lymphocytes and histiocytes (containing hemosiderin) may add to the pre-existing inflammation due to the primary condition being biopsied.
- Avoid taking biopsy over bony prominences or pressure bearing areas:
- As a sparse non-specific lymphocytic infiltrate present over frictional sites can complicate its interpretation.
- Mild to moderate epidermal hyperplasia is normally present over these frictional and pressure sites and can complicate interpretation.
- Biopsies from the leg or foot or over bony prominences are more painful to patients as they are more liable to be traumatized during movement.
- Biopsy wounds over these sites take slightly longer to heal.
- Biopsies over the foot and lower legs show a higher tendency to develop bacterial infection. However, this may depend on the patient′s environment and hygiene practices.
Choice of punch
A wide range of biopsy punches are now available from 2.5 mm, 3 mm, 4 mm to even 6 mm. From a diagnostician′s viewpoint, bigger the punch better is the yield. However, ordinarily a 4 mm punch is adequate for reaching diagnosis in inflammatory diseases. In cosmetically important areas 3 mm or even 2.5 mm punch can give equally good results with a well-trained dermatopathologist. When using smaller punches it is important to ensure proper handling of the sample after biopsy as slightest injury to biopsied tissue can cause compression artifacts. This can jeopardize the whole exercise of doing a biopsy as such artifacts may render small biopsies non-interpretable. In case of small biopsies, it is also necessary to inform the technician regarding the size of biopsy. This helps avoid any errors of misorientation and other problems in handling specimens.
Special situations
Biopsy of a lesion of mastocytosis can cause degranulation of mast cells making it a little difficult to identify such cells with special stains. This is particularly so in the varieties of mastocytosis that do not have large number of mast cells in the skin lesions viz. telangiectasia macularis eruptiva perstans and some lesions of urticaria pigmentosa. Hence, it has been advised that handling trauma during biopsy be minimized in these cases. [3]
Technique of punch biopsy
While the correct technique of doing a punch biopsy is amply elucidated in several texts, two most common errors in the technique of punch biopsies need to be emphasized. They are:
- Non-visualization of the deep dermal plexus and subcutaneous fat in biopsies.
- Compression artifacts making cellular identification impossible.
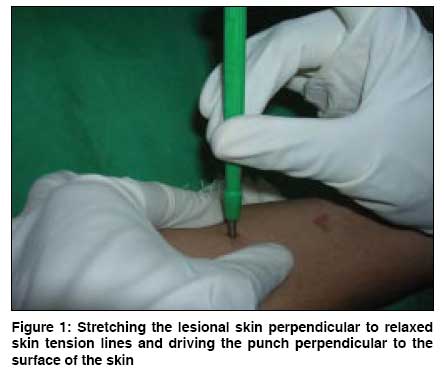
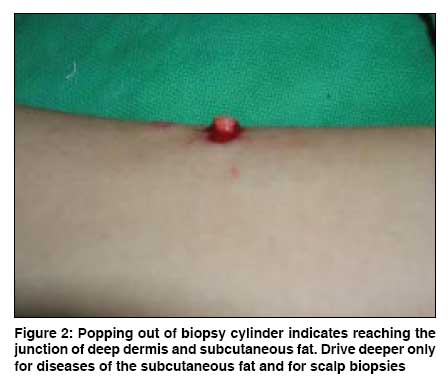
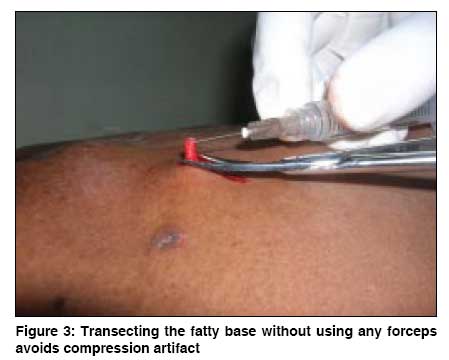
Skin biopsy punch is a cylindrical cutting instrument. After selecting a biopsy site, clean it gently with alcohol so as to leave vesicles and scales intact. Anesthetize the area by raising a skin wheal with 0.2 to 0.5 ml of lignocaine injected into deep dermis. The skin is then drawn taut by stretching it perpendicular to relaxed skin tension lines [4] with the thumb and forefinger of the physician′s free hand [Figure - 1]. The circular cutting edge of the punch is applied firmly and perpendicular to the skin surface. The punch is firmly pushed against the skin and rotated between the thumb and the forefinger, so as to carry the punch up to the subcutaneous fat. A feeling of ′giving way′ marks the point of reaching the subcutaneous fat. Pushing the punch beyond the point is only needed for panniculitis, scalp biopsies and deep nodules involving the fascia. An indication that the punch has reached the fat is that on removal of the punch the central cylinder of tissue pops out above the surface of the rest of the skin [Figure - 2]. This can be helped by lightly pressing on the surrounding skin. The popped out cylinder of tissue is then gently lifted by the tip of a hypodermic needle and so as to visualize its fatty base. [1] The fatty base is transected with small curved iris scissors [Figure - 3] and deposited into a prelabelled formalin container.
Please refrain from using any forceps, toothed or otherwise, for holding the biopsy tissue as skin biopsy specimens are small and delicate and holding them with even plain forceps may lead to loss of half of the tissue for interpretation. It is extremely important at this stage to shake the formalin bottle to check that the tissue is in formalin and not stuck in the lid. It is also the time to check if the sample is adequate especially if panniculitis is suspected. Diagnosis of panniculitis requires more than just a tad of fat and if adequate fat is not seen at the base of the biopsy, a second deeper biopsy may be considered at this stage.
Once the tissue is removed, an oval defect is left and this may ooze blood. Hemostasis can be obtained by use of pressure or chemical agents like Monsel′s solution or isopropyl alcohol 50%, trichloroacetic acid 25% or hydrogen peroxide.[1],[5] If bleeding continues beyond a couple of minutes, one or two sutures with non-absorbable suture material may be needed.
Ideally, a punch biopsy should include the full thickness skin and subcutanous fat to allow correct diagnosis of skin diseases. A not too uncommon misconception about the depth of skin biopsies is that deeper biopsies take longer to heal and leave behind a prominent scar. This is far from true. Biopsies that reach the subcutaneous fat are not only desirable from a diagnostic or esthetic point of view but also heal faster and with a less prominent scar. [1] This is because the subcutaneous fat has a rich network of fine capillaries that helps in the formation of granulation tissue and the healing process. Moreover, when biopsies reach up to fat, due to normal elasticity of the dermis, surrounding skin tends to slide over the fat leaving a defect that is oval and smaller than the punch size. On the contrary, biopsies that have the relatively avascular reticular dermis in their base tend to form slough in their base with higher chance of secondary infection and consequent bad scar.
Add-on tests
Smears from the base of punch biopsies are a useful diagnostic adjunct in many infectious diseases where demonstration of the organisms from a surface smear is difficult. These may vary from the relatively common infections like leprosy or tuberculosis or leishmaniasis or donovanosis to the rare infections like meningococcemia or gonococcemia or the plethora of subcutaneous fungal infections. Some of these organisms are fastidious to grow in the laboratory and this necessitates that the whole of the punch biopsy may be ground with the help of a tissue grinder or manually cut into fine pieces and incoulated into a culture medium. Such biopsies should be sent to the laboratory in sterile normal saline. [6]
Punch biopsies for direct immunofluorescence should be done from perilesional normal skin and they should be fixed in Michel′s medium or sent to the laboratory immediately in cold normal saline to be cut on a cryostat.
Advantages of punch biopsy
- Relatively easy to perform
- Minimal complications
- Provides adequate sample for the common inflammatory dermatoses
- Preferred over shave biopsy for suspected squamous cell carcinoma
Disadvantages of punch biopsy
- Small size and variable depth leads to difficulty in histopathologic interpretation in conditions involving adipose tissue e.g., morphea, paniculitis, erythema nodosum
- Shearing effect of punch may cause loss of blister roof, in such cases a topical refrigerant like ethyl chloride spray can be used to freeze blister in place when punch biopsy is taken
- Not reliable for diagnosis of dermatomyositis (mucsle biopsy) or eosinophillic fasciitis (fascial biopsy)
- Should not be done for suspected melanomas as it can promote dissemination of a melanoma and also compromise interpretation of at least two major criteria for melanoma diagnosis viz. symmetry and circumscription
Scalp biopsy
Punch biopsies of the scalp are reasonably easy to perform and offer diagnostic information in most cases. Owing to the high vascularity of scalp, biopsies in this location heal faster. Small scars that follow biopsy are easy to hide on hairy scalp. However, one can reduce bleeding and improve scar appearance by taking one or two stitches. While performing biopsies on scalp, one needs to attend to a few additional points.
- Trim the hair over the scalp prior to biopsy instead of shaving the hair. Keeping a centimeter of hair shaft above surface gives a good idea to the technician about the direction of hair growth.
- Note trichoglyphic pattern and do the biopsy by rotating the punch in the direction of hair growth to reach not just up to the roots but beyond them. In normal scalp hair, bulbs are located deep in subcutaneous fat and hence reaching just to the top of the fat layer may not be adequate to show the hair bulbs.
- Be prepared for more bleeding while doing scalp biopsies and it is best to take one or two stitches to ensure hemostasis.
- A 4 mm punch is standard for count of hair and is therefore preferred over a 5 mm punch.
- Instruct the technician to cut along the direction of hair growth in scalp biopsies. This maximizes our chances of visualizing the full length of the hair follicles and even the bulbs.
- Horizontal sections can be done on punch biopsies of the scalp. [7] However, for this purpose a bigger punch size may be needed.
Nail biopsy
While punch biopsies do not provide ideal samples for nail histopathology, they are relatively easier to perform and hence are preferred by many dermatologists. A single punch biopsy is adequate to sample a diseased nail plate especially when ruling out onychomycosis is a major concern. [6] A small 2 to 3 mm punch biopsy is adequate for nail plate or even nail bed in most instances. For biopsy of the nail bed and nail matrix, a two-punch method may be used. In this technique, a larger size punch is used to remove overlying nail plate and then a smaller punch is used to sample the bed or matrix.
Due to high vascularity of the nail unit, a tourniquet should be applied before the procedure (and removed after the procedure). A ring block anesthesia ensures relatively painless procedure. However, it must be remembered that lignocaine with adrenaline can not be used for ring block anesthesia at this site. Biopsies of the nail unit tend to heal well. However, all care must be taken to avoid bacterial infection as the nail plate lies very close to the periosteum.
Conclusion Mastering the deceptively simple technique of doing a punch biopsy is a useful life skill for a resident in training. Familiarity with the technique takes away physician′s inhibitions to undertaking the biopsy and improves patient management by zeroing in on the correct diagnosis and treatment.
References
| 1. | Robinson JK. When to biopsy. In: Fundamentals of skin biopsy. Chicago: Year Book Medical Publishers; 1986. p. 1-6. Back to cited text no. 1 |
| 2. | Bhatia AC. Operative procedures. In: Arndt KA, Hsu JT, editors. Manual of dermatologic therapeutics. 7th ed. Philadelphia: Lippincot, Williams and Wilkins; 2007. p. 245-54. Back to cited text no. 2 |
| 3. | Mehregan AH. Technical data, including pitfalls and artifacts. In: Pinkus's guide to histopathology. 4th ed. Connecticut: Appleton-Century-Crofts; 1986. p. 41-6. Back to cited text no. 3 |
| 4. | Rosai and Ackerman. Skin-dermatoses tumours and tumour like conditions. In: Rosai J, editor. Surgical pathology. 9th ed. USA: Mosby, Elsiever Inc.; 2004. p. 93. Back to cited text no. 4 |
| 5. | Elenitsas R, Ming ME. Biopsy techniques. In: Elder DE, editor. Lever's histopathology of the skin. 9th ed. Philadelphia: Lippincott Williams and Wilkins; 2005. p. 7-8. Back to cited text no. 5 |
| 6. | Whiting DA. Diagnostic and predictive value of horizontal sections of scalp biopsy specimens in male pattern androgenetic alopecia. J Am Acad Dermatol 1993;28:755-63. Back to cited text no. 6 [PUBMED] |
| 7. | Kumar CA, Pande S. Methods of specimen collection for diagnosis of superficial and subcutaneous fungal infections. Indian J Dermatol Venerol Leprol 2007;73:202-5. Back to cited text no. 7 |
Copyright 2008 - Indian Journal of Dermatology, Venereology and Leprology
The following images related to this document are available:
Photo images
[dv08233f3.jpg]
[dv08233f1.jpg]
[dv08233f2.jpg]
|
