 |
| About Bioline | All Journals | Testimonials | Membership | News |
|
||||||
|
||||||
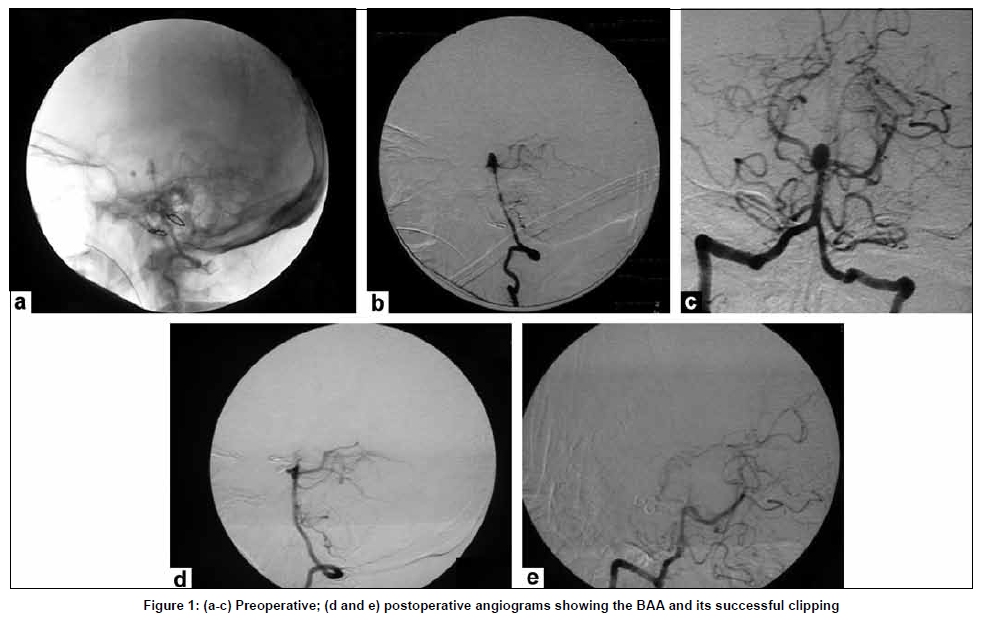
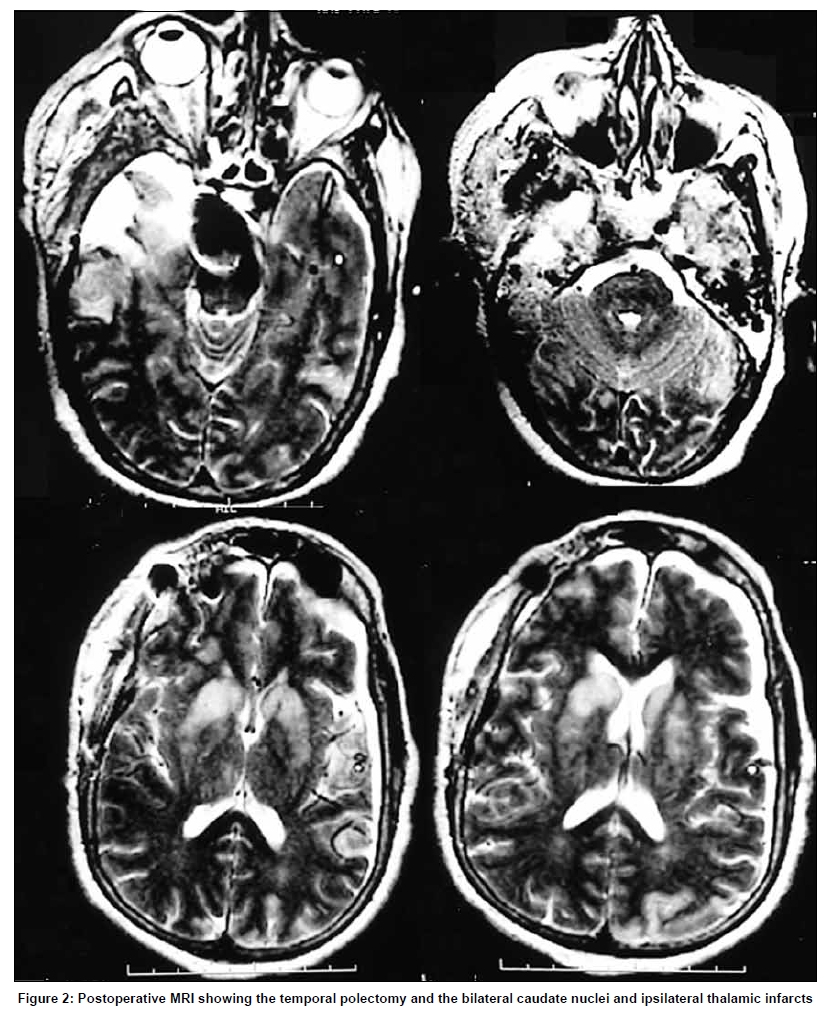
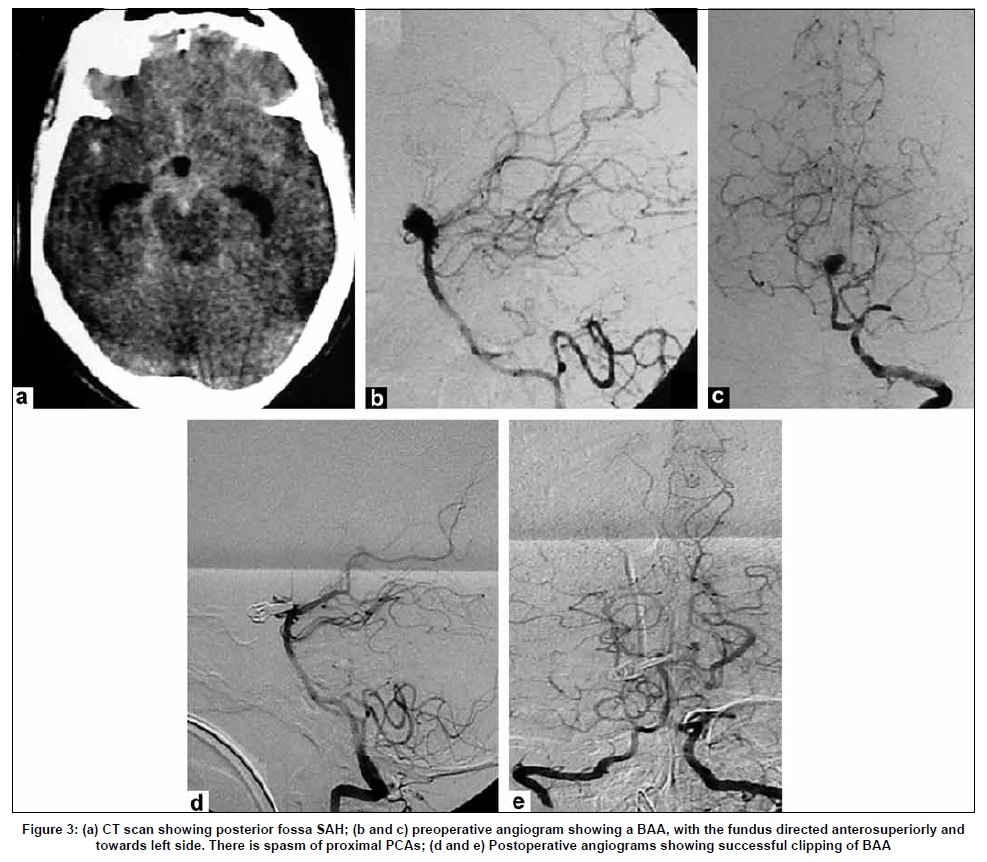
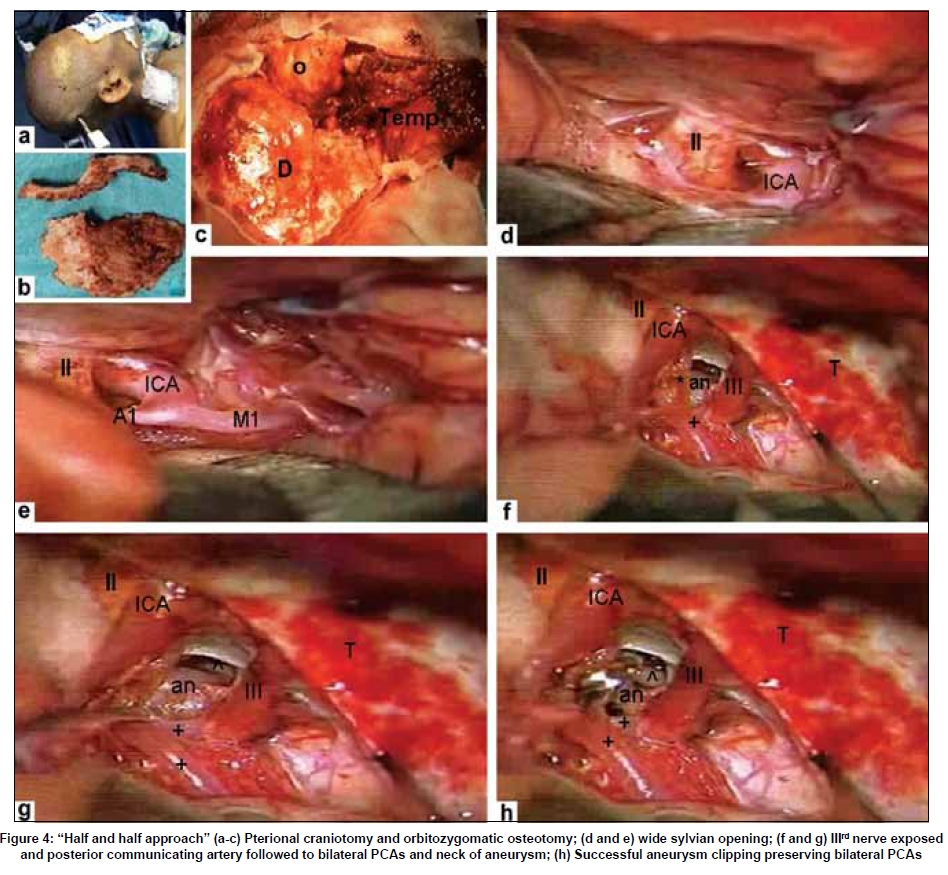
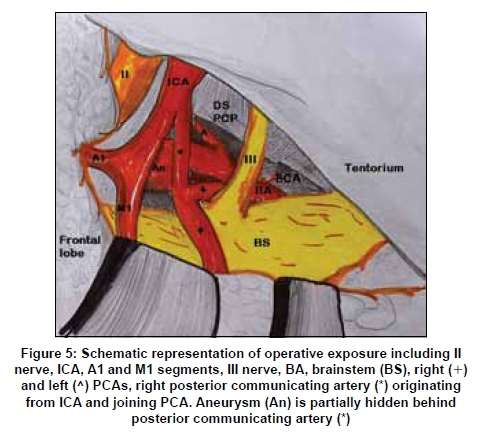
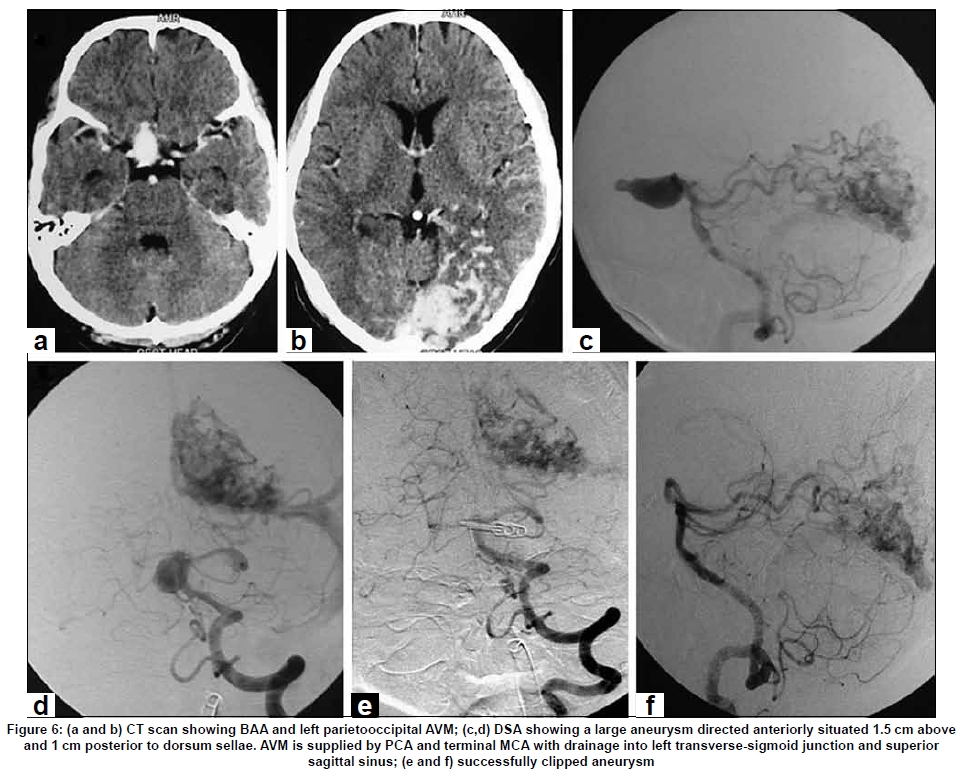
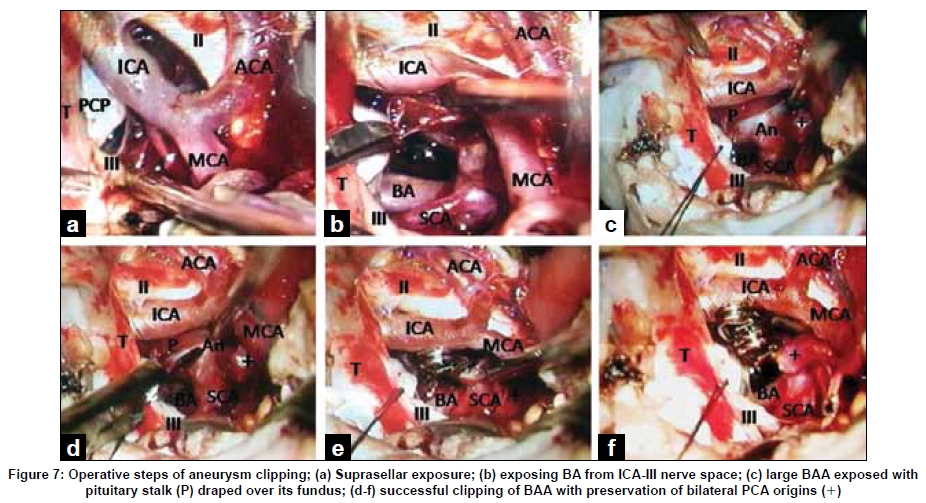
Neurology India, Vol. 57, No. 4, July-August, 2009, pp. 438-446 Original Article Fronto-temporo-orbitozygomatic craniotomy and "half-and-half" approach for basilar apex aneurysms Sanjay Behari, Rupant K. Das, Awadhesh K. Jaiswal, Vijendra K. Jain Department of Neurosurgery, Sanjay Gandhi Postgraduate Institute of Medical Sciences, Lucknow, India Correspondence Address: Dr. Sanjay Behari, Department of Neurosurgery, Sanjay Gandhi Postgraduate Institute of Medical Sciences, Lucknow - 226 014, India.sbehari@sgpgi.ac.in Date of Acceptance: 02-Jul-2009 Code Number: ni09125 PMID: 19770545 DOI: 10.4103/0028-3886.55609 Abstract Background: Basilar apex aneurysms (BAA) are located in interpeduncular cistern surrounded by eloquent neurovascular structures. Surgical access is difficult due to narrow surgical corridors and requires traversing through a depth of 6-8 cm of subarachnoid space. Keywords: Aneurysm surgery, basilar bifurcation aneurysm, orbitozygomatic osteotomy, posterior circulation aneurysm, skull base approach Introduction Basilar apex aneurysms (BAA) are a surgical challenge due to their location in the anatomically complex interpeduncular cistern through narrow corridors surrounded by eloquent neurovascular structures, with possibility of major vessel and perforator injury and difficulty in obtaining proximal and distal control. Combining Hero's orbitozygomatic osteotomy [1] with Yasargil's frontotemporal transsylvian [2] and Drake's subtemporal [3] approaches, the "Half and Half" approach is a simple method of gaining a wide corridor to the BAA, especially for nearly 95% of the BAAs that lie in the 8mm space 5mm below to 10mm above the tip of dorsum sellae, that is not available when these approaches are considered individually. [4],[5] In this study, we describe the surgical management of BAAs utilizing combined subtemporal and transylvian (half and half) approach and review pertinent literature. Materials and Methods Clinical spectrum Five patients (Male: female ratio = 3:2; mean age 42.16 ± 4.3 years) presented with SAH due to BAA. Their clinical presentation included sudden severe headache with neck stiffness (n=5), recurrent vomiting (n=3), transient IIIrd nerve paresis (n=2), right gaze palsy (n=1) and disorientation or altered sensorium (n=4). Their immediate preoperative modified Hand H grades were II (n=1), III (n=1) and IV (n=3), respectively. Their CT scan showed SAH predominantly in the posterior fossa cisterns. In 4 patients, the aneurysms were 0.8-1.2cm in diameter, situated 7mm-1cm above dorsum sellae. Two of them had posteriorly projecting aneurysms. One of the patients had a giant, high BAA (approximately 1.5cm above the dorsum sellae) with a small bleb pointing anteriorly. There was also an associated left parietooccipital AVM. Vasospasm of the PCA/distal BA was seen in 2 patients. In one patient, there was also spasm of A1 segment of right ACA and M1 segment of MCA. Postoperative hypertensive, hemodilutional, hypervolemic therapy (for 2 weeks), phenytoin sodium and nimodipine (the latter two for 6 weeks) were administered. In one patient with postoperative seizures, anticonvulsants were continued beyond six weeks. Operative technique Position and scalp flap The patient was placed supine with head elevated 15-20° , rotated 30-40° to opposite side and slightly extended making malar prominence prominent. The incision extended from just below the root of zygomatic arch anterior to the tragus, continuing across the midline just posterior to the hairline, reaching the contralateral superior temporal line. The supraorbital ridge, the superior and lateral orbital rim and the zygomatic arch were exposed after protecting the frontal nerve in fascial layers. The ipsilateral supraorbital neurovascular bundle was mobilized with the scalp flap by drilling its bony canal. The temporalis muscle was elevated from the temporal bone and retracted inferiorly leaving a cuff on the superior temporal line. Two-flap pterional with orbitozygomatic craniotomy A pterional craniotomy with sphenoid wing drilling until the superior orbital fissure was performed. The middle meningeal artery was coagulated. The orbital fascia was gently dissected off from the orbital roof and orbitozygomatic osteotomy performed. The dura was opened in a "C" shape and its flaps retracted. Frontal and temporal exposure A wide arachnoidal dissection of the sylvian fissure and frontal lobe retraction exposed the IInd nerve, ICA, ACA, MCA and posterior communicating artery. The anterior temporal veins entering the sphenoparietal sinus from the temporal pole were coagulated. A temporal polectomy exposed the tentorial margin and III rd nerve. In 2 cases, the free margin of tentorium was divided posterior to the entry of IV th nerve. Dissection and clipping of the BAA The view was centered at the III rd nerve. The posterior communicating artery was traced from ICA to its entry into ipsilateral PCA. The proximal BA, both PCAs and ipsilateral SCA were exposed to obtain proximal and distal control. The posterior clinoid process was identified but was not drilled in any of our patients. The neck of BAA was exposed by working in the space between distal BA/proximal PCA and the brainstem. The mobilized posterior communicating artery was retracted exposing the neck of aneurysm and was not divided in any patient. The neck of BAA was gently separated from the origins of both PCAs and clipped. In three of the 5 patients, a permanent clip was first placed on the fundus of BAA just distal to its neck. A reinforcing clip was then placed proximally at the neck for the final clipping. Additional exposure One of the patients having a short supraclinoid ICA required drilling of sphenoidal wing and intradural anterior clinoid process removal with carotid collar division to mobilize the paraclinoid and supraclinoid segments of ICA. This helped in medial ICA retraction to provide a wide access to BAA in the carotico-oculomotor nerve space. Results There was no intraoperative rupture. A temporary clipping or posterior communicating artery division was not required in any of the patients. Using this approach, a good proximal control of the proximal basilar trunk and distal control of bilateral PCA were obtained prior to aneurysm clipping [Figure - 1]a-c. Following surgery, one patient developed a transient IIIrd nerve palsy that resolved in 2 months. The patient with the large high bifurcation BAA aneurysm developed transient otorrhoea that resolved with lumbar drainage and oral acetazolamide administration. The DSA following surgery showed complete obliteration of the aneurysms with preservation of PCA and SCA on both sides [Figure - 1]d and e. At follow up (mean: 8.76 3.5 months; range 3 months to 3.5 years), the modified H and H grades were II (n52) and III (n53), respectively. Two of the patients had preoperative hydrocephalus. The lamina terminalis was opened in all patients. In one patient, hydrocephalus resolved following surgery while in the other, a right ventriculoperitoneal shunt was performed. In four patients, the postoperative MR/CT scan did not show any evidence of ischemia or infarction. In one patient, however, the postoperative MRI showed postoperative perforator vessel ischemia with T2 hyperintensities in bilateral caudate nuclei and ipsilateral thalamic regions [Figure - 2]. Representative cases Patient 1 (RK) This 35-year old lady presented with sudden severe headache, vomiting and altered sensorium for 9 days. On examination, she was opening eyes spontaneously with right gaze palsy, not following commands and was localizing with both upper limbs. She also had neck stiffness and Kernig's sign (modified H and H grade IV). Her CT scan revealed SAH in the interpeduncular, ambient, suprasellar and bilateral sylvian cisterns with mild hydrocephalus. There was no evidence of infarction [Figure - 3]a. The vertebral DSA [Figure - 3]b and c revealed a 1cm sized aneurysm arising from BA apex with its fundus directed anterosuperiorly and towards left side. Partially subtracted lateral vertebral angiogram showed the aneurysm to be approximately 1cm above the level of dorsum sellae. There was spasm of proximal PCA. The right and left internal carotid angiogram showed spasm of right ACA and MCA. There was also filling of both PCA from anterior circulation via posterior communicating arteries. The patient underwent a right fronto-temporal craniotomy and orbitozygomatic osteotomy for aneurysm clippng [Figure - 3]d and e and [Figure - 4]a-c. The sylvian fissure was opened widely exposing bilateral optic nerves, right ICA, its posterior communicating and anterior choroidal branches and MCA [Figure - 4]d and e. The anterior temporal veins were coagulated and temporal polectomy performed exposing IIIrd nerve [Figure - 4]f. The posterior communicating artery was followed to origins of both PCA, basilar trunk, ipsilateral SCA and neck of aneurysm [Figure - 4]g. The PCA were gently dissected off and 5mm and 7mm clips were applied to the neck of aneurysm [Figure - 4]h and [Figure - 5]. There was no temporary clipping or intraoperative rupture of the aneurysm. Lamina terminalis was opened to release CSF from the third ventricle. In the postoperative period, she required ventilatory support for a week and underwent tracheostomy. She was discharged on the 16 th postoperative still disoriented, but recognizing close relatives and following simple commands (modified H and H grade III). After 2 months, she developed recurrent left sided focal seizures with drowsiness and left hemiparesis grade II. With the repeat CT scan showing communicating hydrocephalus with periventricular lucency and DSA showing complete obliteration of the BAA [Figure - 3]d and e, she underwent right ventriculoperitoneal shunt. At follow up of 4 months, she became oriented with improvement in hemiparesis (modified H and H grade II). Patient 2 (RA) This 47-year old male patient, a known hypertensive, presented with sudden onset unconsciousness 14 days before admission. After 4-5 hours, he improved to the state of spontaneous eye opening, making incomprehensible sounds with spontaneous, bilateral limb activity. He had significant neck stiffness and Kernig's sign (modified H and H grade IV). CT scan done on the day of ictus showed blood in the suprasellar cistern and bilateral sylvian fissure with intra-third ventricular extension. There was no associated hydrocephalus or infarction. A repeat contrast CT scan at admission showed resolution of SAH and intraventricular blood; an enhancing suprasellar aneurysm pointing anteriorly; and, left parietooccipital serpiginous hyperdensities suggestive of an AVM [Figure - 6]a and b. The lateral vertebral DSA image showed a large BAA directed anteriorly situated 1.5cm above and 1cm posterior to dorsum sellae [Figure - 6]c and d. There was a high flow AVM supplied by left PCA and terminal branches of MCA, and an early drainage into the left transverse sigmoid junction and superior sagittal sinus. Using left frontotemporal craniotomy, orbitozygomatic osteotomy and "half and half" approach, the aneurysm was clipped using two Yasargil's straight 7mm clips. The aneurysm was pushing the chiasma upwards with pituitary stalk draped over its fundus. Both PCAs and left SCA were visualized. No temporary clipping was required. There was no intraoperative rupture of the aneurysm [Figure - 6]e and f, [Figure - 7]. Following surgery, the patient maintained his neurological status but developed left sided CSF otorrhoea that resolved with acetazolamide (250mg QID) and lumboperitoneal drain for three days. His hyponatremia was corrected by oral and parenteral sodium chloride supplementation. He maintained the same neurological status one month following surgery with the repeat DSA showing adequate clipping of the aneurysm [Figure - 6]e and f. The embolization and surgery for AVM was deferred allowing for stabilization and recovery of neurological status. At follow up after three months, he was mildly disoriented, verbalizing in full sentences and walking without support (modified H and H grade III). Discussion Side of approach Nearly 50% of posterior circulation aneurysms are BAAs lying in the interpeduncular cistern approximately 15mm posterior to the ICA. [6],[7] Since BAAs usually occur in the midline, the approach is from the surgeon's dominant side. Distal BA turtuosity or direction of BAA [4] and a dominant or fetal posterior communicating artery also influence the side of approach [8],[9],[10] with the side of nondominant posterior communicating artery being preferred (in case it has to be divided to gain access to the BAA). The other characteristics that determine the side of approach include presence of ipsilateral III rd nerve paresis, contralateral hemiparesis (to avoid their bilateral occurrence), the height of aneurysm in relation to dorsum sellae (the lesions 5mm below to 10mm above the top of dorsum sellae being more accessible), the length of supraclinoid ICA (as a short ICA with low bifurcation will limit retraction thereby decreasing working space between it and III rd nerve); and, site of haematoma and vasospasm. [11] Endovascular versus surgical treatment Endovascular treatment is the preferred modality of treatment for these aneurysms. Assessment of long term risks of endovascular treatment versus surgical clipping in the International Subarachnoid Aneurysm Trial (ISAT) showed that 24 rebleeds had occurred more than 1 year after treatment. Of these, 13 were from the treated aneurysm (ten in the coiling group and three in the clipping group). The risk of death at 5 years was significantly lower in the coiling group than in the clipping group, but the proportion of survivors at 5 years who were independent did not differ between the two groups. [12] Coiled BAA may, however, have a 1.3% bleeding rate per year with the annual risk of bleeding in partially coiled aneurysms increasing to 2.1% (nearly equal to annual risk of unruptured aneurysmal bleeding); and, a 24% coil compaction rate. [13] In giant or wide necked aneurysms (n51; present study), posteriorly directed dome (n52; present study), those with extreme tortuosity or dolichoectasia of BA; and, those that include PCA origin in its neck, clipping may be preferable to embolization. [14] Endovascular techniques have actually generated the need for development of surgical expertise for managing more difficult aneurysms of this location. Approaches to the BAAs Among the conventional approaches, Yasargil's transsylvian approach for BAA has the advantages of being familiar, traversing the shortest distance between BA and ICA, and providing a wide exposure of the interpeduncular cistern. [2] Anterior visualization for aneurysms with necks at level between the mid-depth of sella turcica and a line 1cm superior to the posterior clinoid process is facilitated. The disadvantages of this approach include difficulty of visualizing posterior perforators and of inspecting clip blades. Posteriorly directed aneurysms, aneurysms with necks lying inferior to midsellar level, and extremely high BAA aneuryms are difficult to approach.[11] Drake's subtemporal approach eases visualization of posterior perforators and in obtaining proximal control. [3],[15] Tentorial division expands the field of view to upper third of clivus. The limitations of this approach lie in difficulty in gaining distal control of contralateral P1 segment for trapping and perforator inspection, and a narrow field of view. An edematous temporal lobe either because of SAH, hematoma, ischemia or following retraction makes exposure difficult. Neither of the approaches, therefore, is sufficient alone as both anterior and lateral orientations are required for successful dissection and clipping of BAA. [16] The alternative skull base approaches to access BAA include Dolenc's modified pterional transcavernous-transsellar approach [17] and, Krisht's pretemporal transzygomatic transcavernous approach. [10] Both these approaches facilitate BAA exposure without significant frontotemporal lobe retraction. A frontotemporal craniotomy, orbitozygomatic osteotomy and combined transylvian and subtemporal approaches (the "half and half" conversion) [1],[5],[18] provides a wide arc of exposure of the interpeduncular cistern with adequate proximal BA and distal PCA control. [1],[11],[19],[20] Multiple corridors to basilar bifurcation between II nd nerve and ICA, ICA and III rd nerve, or III rd and tentorial incisura are available. High BAA (more than 1cm above dorsum sellae) are directly accessible, facilitated by slight operating table tilt; flattened surgical field provided by inferior reflection of the temporalis muscle and the zygomatic osteotomy; and, increased superiorly projecting surgical angle over the orbit. [10] This was evident in our patient where the giant BAA was situated about 1.5cm above dorsum sellae, elevating and stretching optic chiasma. Drilling dorsum sellae provides access to a low lying BAA below the level of sellar floor. [8],[10],[11] Medial ICA mobilization by sphenoid wing and ACP drilling and carotid collar division (carried out in one patient who had a short ICA with early bifurcation) further increases access to the BAA between the ICA and IIIrd nerve. [11],[17],[21],[22],[23] Technical details During the "half and half" approach, certain surgical nuances helped in complication avoidance. [4],[24] Fully exposing MCA in the sylvian fissure from ICA to MCA bifurcation prevented its kinking and consequent ischemia during fronto-temporal lobe retraction. [24] Visualization and protection of anterior choroidal artery also avoided infarction. Anterior temporal veins were divided and subpial, temporal polectomy was performed to obtain an unhindered view of the tentorial surface posterior to the point of entry of IV th nerve. At this site, the tentorium could be easily divided to gain extra exposure of the interpeduncular cistern. It also facilitated division of the arachnoidal granulations tethering the uncus to III rd nerve. The P1 segment in the incisural space lateral to the brain stem was followed to the BA. Proximal control was obtained on BA inferior to III rd nerve to leave more working space for clipping. The perforators adherent to posterior wall of the aneurysm and the BA were gently separated and the contralateral P1 segment was seen by utilizing the plane posterior to the aneurysm-distal BA complex. [6],[24] In three patients, a "two clip technique" was utilized. The initial clip was placed slightly distal to the neck on the fundus of the aneurysm. The proximal clip was then applied to the actual neck of aneurysm. Since temporary clipping was not undertaken, the distal clip collapsed the walls of aneurysm and facilitated proper placement of the proximal clip; the weak area on the fundus of aneurysm was secured; and, gently slipping the initially applied distal clip towards the neck of the aneurysm ensured that origin of PCA was not compromised by clip blades. A distal fenestrated clip that includes ipsilateral P1 segment in fenestration may also be applied to the fundus from a lateral aspect before clipping the actual aneurysmal neck. [4] Trapping of the aneurysm or placement of a proximal temporary clip significantly softens the aneurysm reducing chances of its rupture; it was, however, not performed in any of our cases. For giant or high-riding BAA, hypothermic circulatory arrest can be an invaluable adjunct. [25] We admit that our patient having both BAA and AVM could have been simultaneously managed by the endovascular technique. Surgery was undertaken since the aneurysm was large, wide-necked and tenting the chiasma. Coiling, therefore, would not have relieved the mass effect produced by the aneurysm on the optic apparatus. Conclusions The frontotemporal craniotomy, orbitozygomatic osteotomy and "half and half approach" is a simple modification that provides a wide surgical corridor to BAAs from 5mm below to greater than 1cm above dorsum sellae. It facilitates an adequate proximal control of BA. It should be a part of the surgical armamentarium especially in situations where endovascular embolization is prone to failure such as in the presence of large and giant, or wide-necked BAAs or vertebrobasilar tortuosity; when coil compaction or postcoiling re-rupture occurs; and, when there is an associated large haematoma. Abbreviations used in the text and photographs II: Optic nerve, III: Oculomotor nerve, IV: Trochlear nerve, ICA: Internal carotid artery, MCA: Middle cerebral artery, M1: M1 segment of MCA, ACA: Anterior cerebral artery, BA: Basilar artery, SCA: Superior cerebellar artery,FNx01: Posterior communicating artery, right (+) and left (^) posterior cerebral arteries and its P1 (P1) segment, an: Aneurysm, BAA: Basilar apex aneurysm, PCP: Posterior clinoid process, , ACP: Anterior clinoid process, T: Tentorium, P: Pituitary stalk, D: Dura, o: Orbit, Temp: temporalis muscle, Hand H: Hunt and Hess grade, SAH: Subarachnoid hemorrhage, CSF: Cerebrospinal fluid, AVM: Arteriovenous malformation CT: Computed tomography, MRI: Magnetic resonance imaging, DSA: Digital substraction angiogram References
Copyright 2009 - Neurology India The following images related to this document are available:Photo images[ni09125f6.jpg] [ni09125f1.jpg] [ni09125f3.jpg] [ni09125f5.jpg] [ni09125f2.jpg] [ni09125f7.jpg] [ni09125f4.jpg] |
| |||||||||