 |
| About Bioline | All Journals | Testimonials | Membership | News |
|
||||||
|
||||||
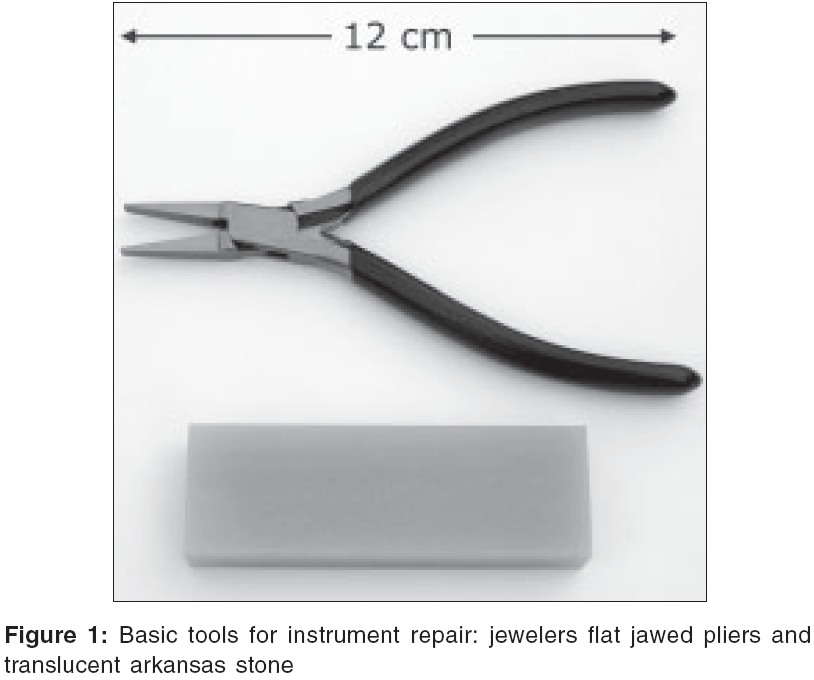
Indian Journal of Plastic Surgery, Vol. 39, No. 1, January-June, 2006, pp. 51-56 Special Article Notes on the care, restoration and repair of microsurgical instruments Acland RobertD Department of Surgery, University of Louisville School of Medicine, 610 South Jackson Street, Louisville, Kentucky 40292 Code Number: pl06011 Abstract The high cost of microsurgical instruments is multiplied by failure to care for them appropriately. This paper describes effective practical measures for the care of microsurgical instruments; and shows detailed procedures for restoring and repairing the instruments most often damaged: jewelers' forceps and scissors.Keywords: Micro instruments, restoration, repair Introduction While reconstructive microsurgery continues to grow and gain acceptance, the cost of high quality microsurgical instruments can create hardship for the surgeon, for the hospital and for the patient. The high cost is multiplied many times over if they are not given appropriate preventive care; and if damaged instruments are discarded, not repaired. Because high quality instruments are so costly, cheaper instruments of lesser quality are sometimes used, even though they are often made of softer, more corrodible metal, are shaped with less precision and do the job less well. The useful life of microsurgical instruments can be greatly extended by appropriate preventive care, by sharpening and by the repair of minor damage. It probably costs no more in the long run to buy high quality instruments and keep them in good repair, than to buy cheaper instruments which perform less well and last a shorter time. This paper describes effective practical measures for the care of microsurgical instruments; and shows detailed procedures for restoring and repairing the instruments that are most commonly damaged, jewelers' forceps and scissors. These recommendations are based on the author's personal laboratory and clinical experience, gained through necessity. The principles of preventive care are easy to carry out and can readily be understood by members of the operating theatre staff. The skills of instrument repair can be learned by anyone with normal eye-hand co-ordination, using an operating microscope and the tools described in this paper. Instrument Care Storage and handling Store and handle microsurgical instruments so that their tips never come into contact with other hard objects. Except when they are in the surgeon's hand or being cleaned, make sure that they are either in a rack in an instrument case, or lying apart from each other on a non-metallic surface. When moving a set of instruments, pick them up and put them down one at a time, rather than bunching them together in a handful or tipping them from one container to another. When using an instrument, do not tap it on a hard surface to change its position in the hand. When placing instruments to soak after use, use a bowl made of plastic, not metal. Be sure these instructions are understood by all who may handle the instruments. It is the experienced micro-surgeon's responsibility to pass on these instructions to inexperienced nurses and junior surgeons. To avoid electrolytic corrosion, ensure that high quality instruments do not come in metal-to-metal contact with lower quality instruments specially when wet. Cleaning Blood that is left on instruments can initiate corrosion. Blood that hardens between the spring leaves of microvascular clamps will prevent movement and strain the springs. Blood in the sliding joints of an approximator clamp may lock the clamps onto the sliding bar. Rinse instruments immediately after use, before the end of the procedure and before blood has time to dry. Use distilled or de-ionized water if available; not saline. After a procedure, soak the instruments for 15 minutes in a solution of enzyme detergent. While soaking approximator clamps, slide them along their bar a few times to clear blood from the sliding joints. After soaking spring-handled instruments, open the hinge fully by uncoupling the handles and clean the articulating surfaces with a soft toothbrush. After soaking microvascular clamps, use a strong, fine jet of water to remove softened blood from the tight spaces between the hinges and from the sliding joints of approximator clamps. Use a 10 ml syringe armed with a short 25 gauge needle. Neglected accumulations of dried blood, hardened by autoclaving, must sometimes be removed. Enzyme detergent solutions, though useful for new blood deposits, are ineffective in such cases. Hardened blood deposits are best removed by soaking for 12 hours in a 10% solution of potassium (or sodium) hydroxide, followed by prolonged, vigorous rinsing as above. Use due caution regarding eye and skin protection, in handling this strongly alkaline solution. Autoclaving When an instrument case has to be wrapped for autoclaving, use the fewest possible layers of cloth so as to promote drying. Even stainless steel can rust under extreme conditions of heat and moisture. If the autoclave's vacuum cycle is effective, rusting is unlikely; but if it is ineffective, the instruments will stay wet after autoclaving and may rust. Demagnetization Instruments that are magnetized will either attract or repel microsurgical needles, which may themselves become magnetized. To demagnetize an instrument, hold it within the coil of a demagnetizer. Switch on the demagnetizer and while keeping it switched on, slowly draw the instrument away from it by a full arm's length, then switch off. Outsourcing It is now a common policy for hospitals, in the interests of economy, to outsource the care of instruments to personnel who are remote from the facility and beyond the reach of instruction. Outsourcing is a disaster for microsurgical instruments: they quickly become unusable, often at the first pass. In the interest of the patient, we should strongly resist the outsourcing of microsurgical instruments and demand that special arrangements be made for their care by properly instructed personnel. Repair and maintenance The instruments that most often need repair and maintenance are jewelers'forceps and scissors. The procedures described here are the straightening and reshaping of forceps and the sharpening of scissors. Set up a solid table for this work, use an operating microscope that allows you to look straight downward and a stool adjustable for height. Tools needed Three tools are needed for simple repair and maintenance.
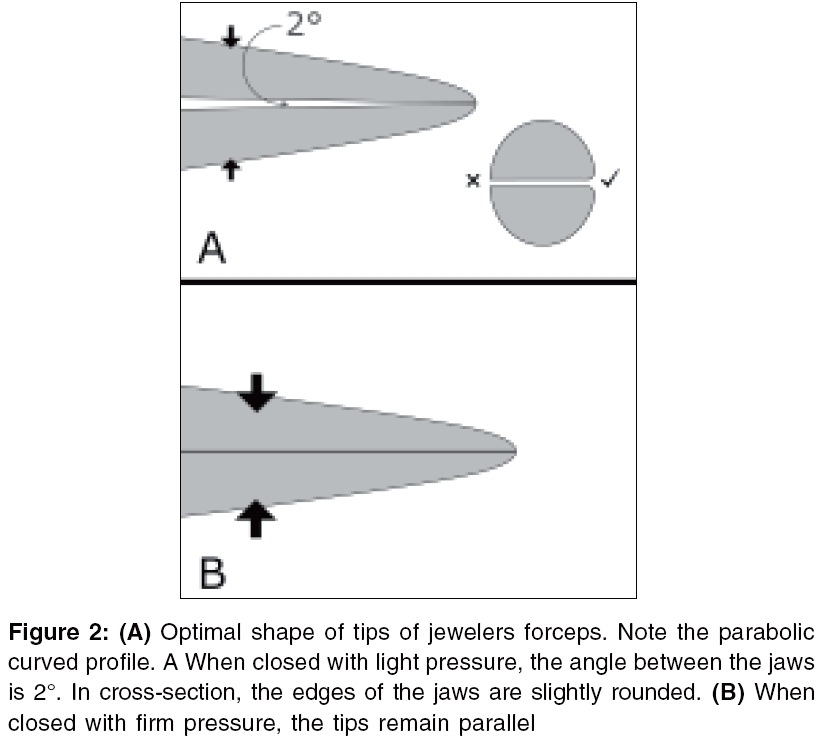
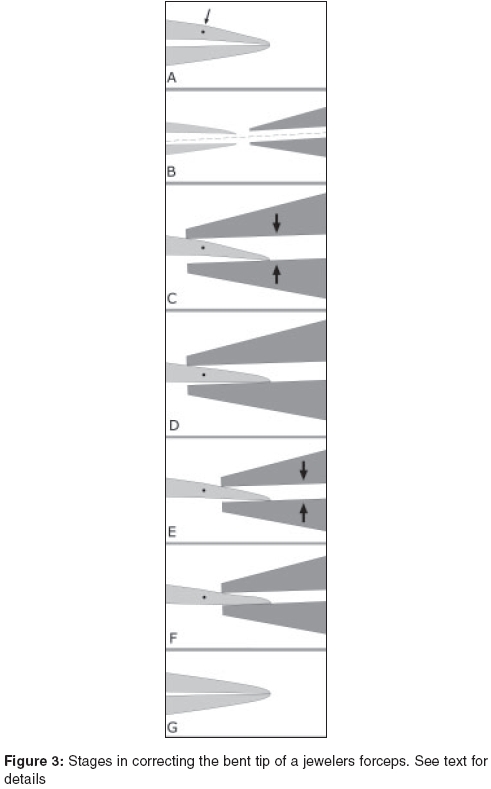
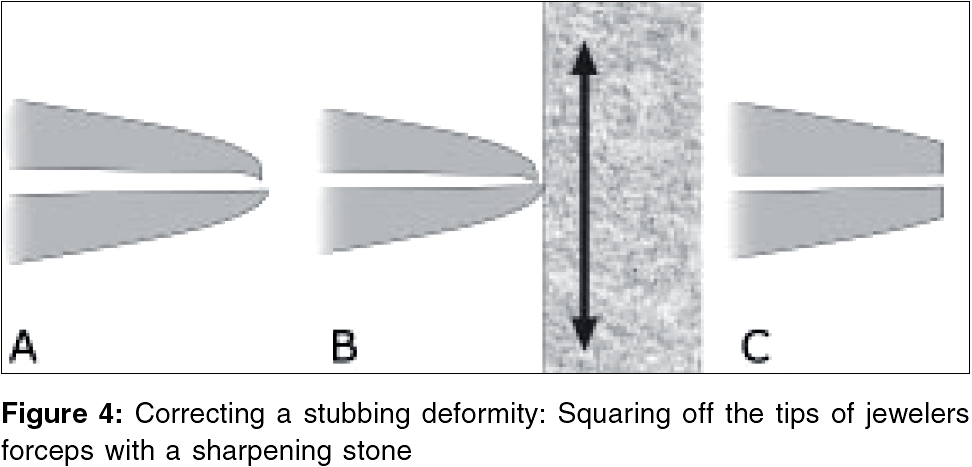
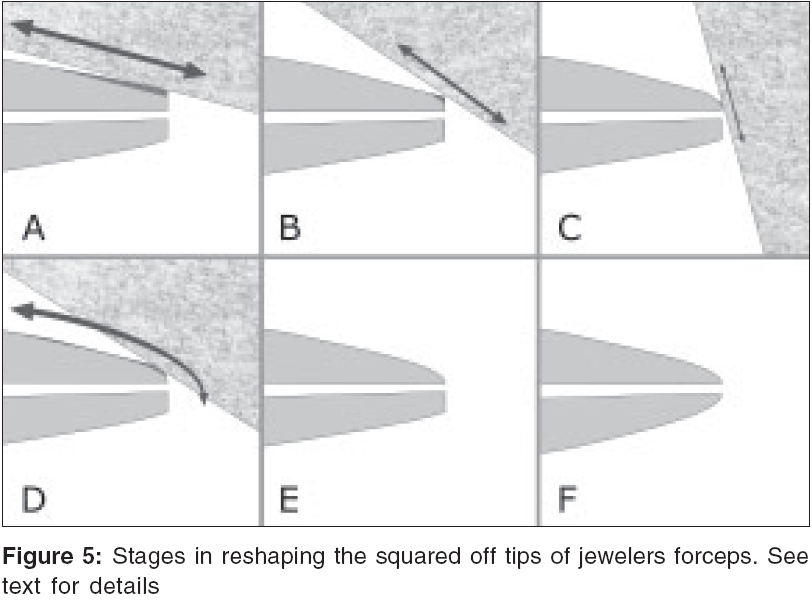
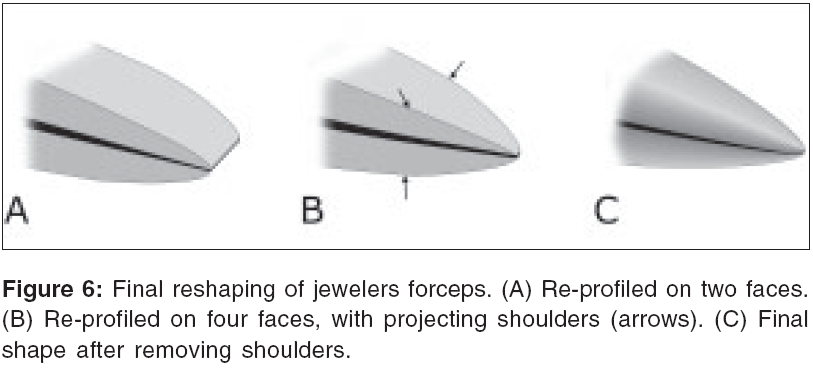
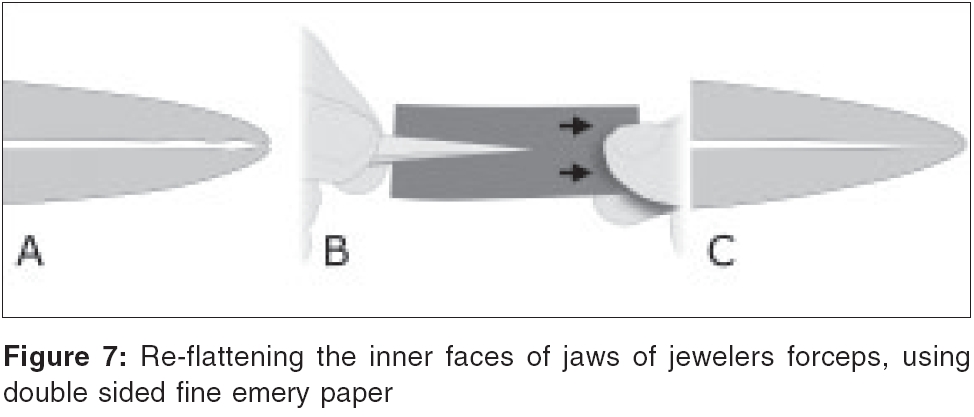
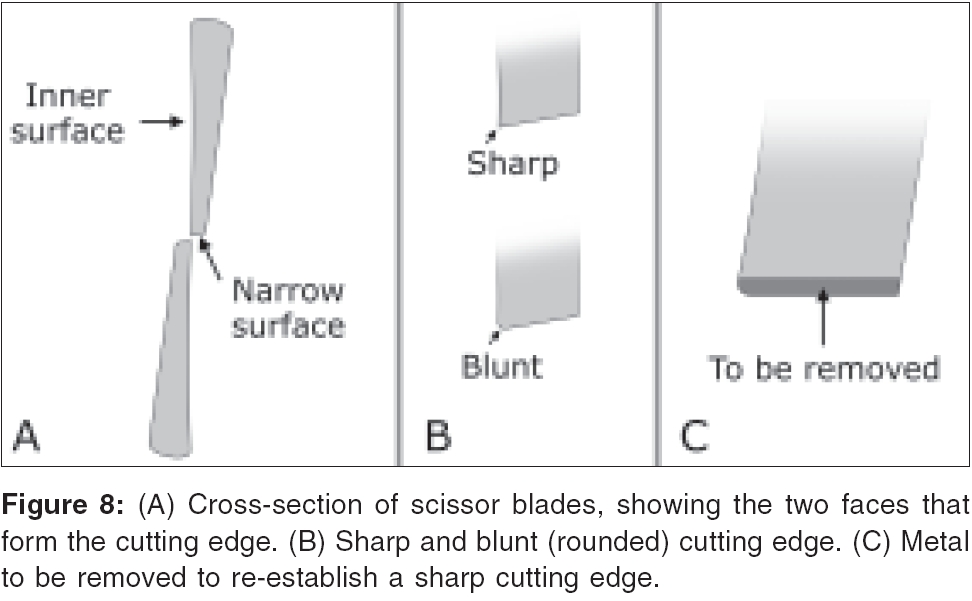
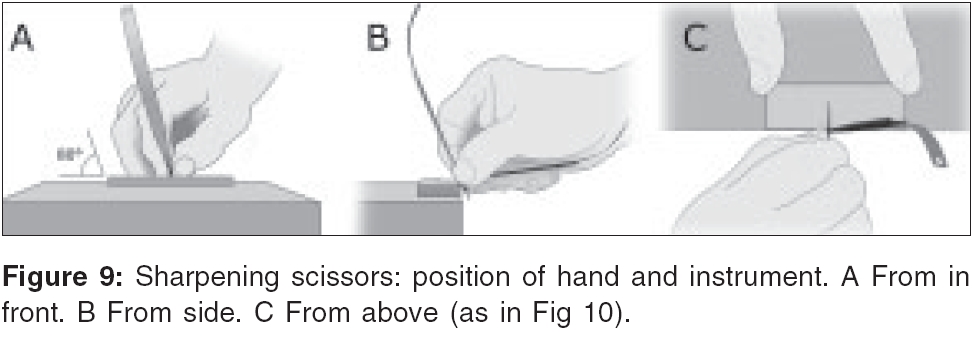
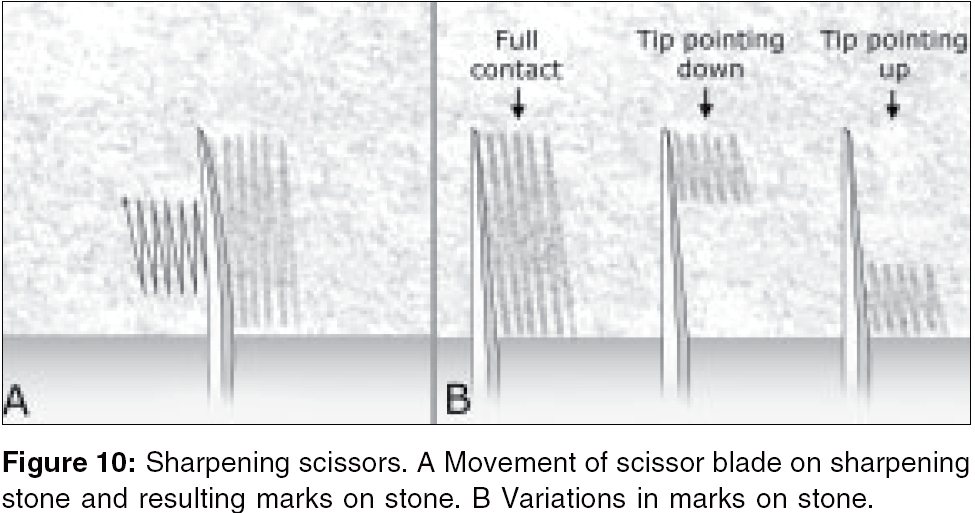
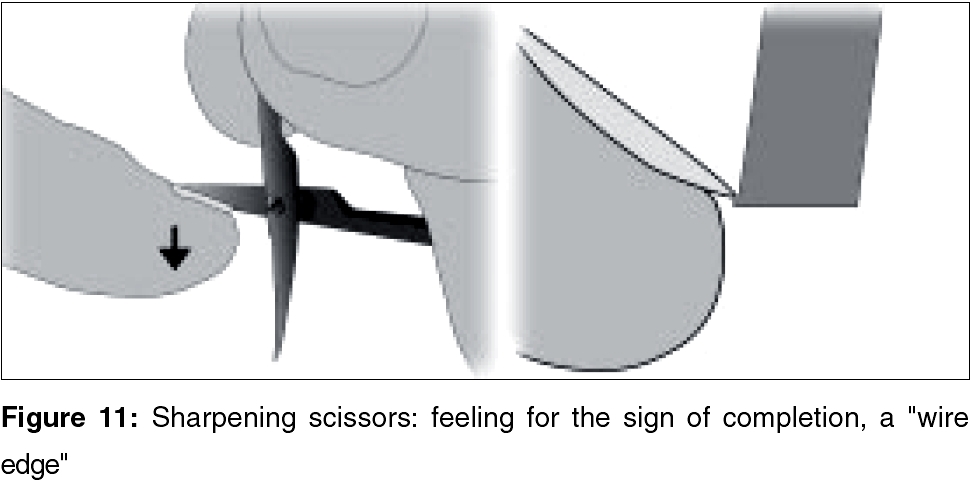
Details regarding suppliers are given below. Forceps [Figure - 2]A shows the ideal profile and cross-section of the tips of jewelers'forceps. When viewed from any angle the profile describes a parabolic curve that lets the eye see what the point of the instrument is doing. When just touching, the tips meet at an angle of 2 degrees. Seen in cross-section, the edges of the inner surfaces are slightly rounded, to avoid thread breakage when suturing. When firmly closed [Figure - 2]B the tips remain parallel, with no re-opening at the tip. The most common deformities of jewelers' forceps are mal-alignment of the jaws caused by a bending force and a "stubbing" deformity caused by dropping on a hard surface. Mal-alignment is treated by straightening; stubbing deformities are treated by squaring off the tips and reshaping them. When straightening a mal-aligned jaw, be aware that the tips of jewelers' forceps are especially hardened and will readily snap if bent too sharply. Hold the forceps and the pliers flat on the table. To correct an inward bend, angle the long axis of the pliers at about 2° relative to the long axis of the forceps [Figure - 3]A. Determine the place where the jaw has been bent, indicated by the dot in [Figure - 3]B. Place the open jaws of the pliers slightly proximal to the bend and bring them together gently, without completely closing them [Figure - 3]C, D. Move the pliers slightly distal to the bend and repeat the action [Figure - 3]E, F. Adjust the amount of correction by increasing or decreasing the angle of the pliers relative to the forceps, until the jaw is straight [Figure - 3]G. To correct an outward bend, use the same action, with the angle of approach of the pliers reversed. To correct a cross-bite deformity, have the instrument on its side, with the damaged jaw downward. In a stubbing deformity, one tip is shortened and bent sharply inward [Figure - 4]A. Both tips must be cut off squarely, to the same length and then re-shaped. Place the forceps and the sharpening stone flat on the table, with the stone at 90° to the forceps [Figure - 4]B. Hold the forceps still and move the stone. With a few firm strokes remove the tips, back to a point where their inner surfaces are again parallel [Figure - 4]C. Re-shape the outer curve of each tip, following the steps shown in [Figure - 5]. Start with the stone at a slight angle to the instrument, using a vigorous action and firm pressure [Figure - 5]A. Increase the angle and take off more metal closer to the tip, with fewer, gentler strokes [Figure - 5]B. Increase the angle again, to about 70°, working even more gently [Figure - 5]C. With a rough profile established, use a rocking action with the stone [Figure - 5]D, never quite touching the very point of the instrument, to create the final shape [Figure - 5]E. Turn the instrument over and repeat the steps on the other jaw [Figure - 5]F. The tips now have the right profile when seen from above, but are still square when seen from the side [Figure - 6]A. Turn the instrument through 90° and shape the sides in the same way. The tips are now well profiled on four faces [Figure - 6]B, but are still rectangular in cross-section, with four projecting shoulders (arrow) that create unnecessary bulk. Remove these shoulders with a few light strokes of the emery paper strip, to give a tip that has the same profile from all angles [Figure - 6]C. Finally, using the emery strip, round off the sharp corner edges of the inner surfaces of the jaw, to prevent a cutting action when handling thread. In doing this, avoid touching the very point. Jewelers'forceps that are otherwise undamaged may have irregularities or a lack of flatness, of the two inner surfaces of the jaws [Figure - 7]A. To correct this, place the double-sided emery paper strip between the jaws, hold the forceps closed with moderate pressure and pull on the emery strip. Repeat this several times, always pulling, not pushing on the emery strip, to regrind the flat surfaces [Figure - 7]B. When finished, round off the corner edges as above. Scissors Before sharpening microsurgical scissors with an ultra fine stone, it is best to practice sharpening larger, ring-handled scissors, following the recommended procedure but with an ordinary fine grade sharpening stone for faster action. Two surfaces, one broad and one narrow, meet to form the cutting edge of a scissor blade [Figure - 8]A. The broad surface, the inner face of the blade, is hollow-ground to ensure that the blades touch each other only where their two cutting edges meet. The narrow surface (it has no official name) meets the inner face at an angle that is usually 80°. When the narrow surface is perfectly flat from side to side, meeting the inner face at a precise angle, the blade is sharp. When it is worn down so that its meeting with the inner face is slightly rounded, the blade is blunt [Figure - 8]B. The two blades, acting on each other, become blunt to the same degree. All sharpening involves removing metal. In sharpening scissors, enough of the width of each blade is removed to take away the rounded edge and create a new, flat narrow surface that meets the inner face at a precise angle [Figure - 8]C. Place the sharpening stone on a flat board as thick as the length of the scissor blade. Do not put oil on the stone: oil makes it hard to "read" the marks made on the stone by the scissor blade. (The stone can be cleaned after use with detergent and scouring powder or with an oily cloth). Disarticulate the scissor handles and open the scissors so that the two blades are at right-angles. Grasp the hinge firmly between finger and thumb, cradling the handle of the blade that is to be sharpened in the palm of the hand. Place the blade to be sharpened level on the stone, with its narrow surface on the stone. The blade not being sharpened points downward, its handle points upward. To tilt the instrument at the correct angle for sharpening, rotate the hand clockwise so that the upward pointing handle of the blade not being sharpened stands at 10° to the vertical. Lock the hand and wrist in this position while sharpening [Figure - 9]. Move the scissor blade backward and forward on the stone in a zigzag pattern, keeping the narrow surface flat on the stone [Figure - 10]A. Make the movement at the shoulder, to ensure a steady action. A zigzag pattern of marks will appear on the stone, formed of metal dust. If the full length of the blade is in contact with the stone, the pattern of marks will be broad. If the blade is tilted slightly up or down, the pattern of marks will be narrow, its position showing the error and the correction needed [Figure - 10]B. After every 20 strokes, check for the sign of sharpness called a wire edge. This is a very small curl of metal that starts to accumulate in front of the blade, as soon as sharpness is achieved. It is easier to feel a wire edge than to see it. Run a finger nail down the inner surface of the blade towards the cutting edge [Figure - 11]. If a wire edge is present, the movement of the nail is momentarily checked, just before it runs past the edge. If a wire edge can be felt along the whole length of the blade, sharpening is complete. If it is only present on part of the blade, continue sharpening, tilting the blade so as to work on the part that still needs it. With one blade sharpened, turn the instrument over and sharpen the other blade in the same way. When both blades are sharpened, re-articulate the handle ends and close the blades together one time. By this action the two wire edges shear each other off, leaving the instrument ready for use. After sharpening, which slightly reduces the width of the blades, you may find that the tips do not come fully together when the instrument is closed. Their position on full closure is determined by the length of the post that projects from the inner side of one of the handles. It hits the inside of other handle to prevent over-closure. To make the tips close fully again, shorten the post slightly, using a coarse sharpening stone or a dental grinding wheel. Shorten it until the tips not only meet, but go slightly past each another on full closure. A pair of microsurgical scissors can be re-sharpened at least ten times, before becoming unusable. A word of caution is needed, regarding the hollow-ground inner surface of a scissor blade. This surface should never be touched with a sharpening stone, as its three-dimensional curvature, which is essential for effective cutting, can never be restored once it is damaged. After long use scissors become loose, so that the cutting edges no longer make good contact. This happens because of wear beneath the head of the screw that holds the two limbs of the scissors together. The screw cannot be turned: its threads are locked in place when the instrument is made. The only way to tighten the screw is to compress it slightly from end to end. Place the scissors flat on a well supported, thick piece of iron, with the screw head facing upward. Make sure the other end of the screw is touching the steel. Strike the screw head sharply, with a medium weight hammer. Repeat, cautiously, until the looseness is overcome. Warranty concerns There may be a concern that by making these repairs one could lose the protection of the manufacturer's warranty. A warranty typically covers only defects of craftsmanship and materials; it may be voided if repairs have been attempted by unauthorized persons. If an instrument has a defect that raises a question of craftsmanship or materials, it should be returned to the manufacturer, with no attempt at repair; but if the defect has been caused by accidental damage or normal wear and tear, the issue of warranty does not arise: it would be a mistake to consider making a warranty claim in such a case, whether one had worked on the instrument or not. Sources for tools These suppliers are able to ship world-wide Arkansas sharpening stone Flat-nosed pliers, Emery paper Demagnetizer A less expensive demagnetizer is available in India. For details contact Ganga Microsurgery Training Laboratory, Ganga Hospital, Swarnambika lay out, Coimbatore - 641 009. Specially formulated solutions include RapidTM (3M), CidezimeTM (Johnson & Johnson) and EndozimeTM (Ruhof). ACKNOWLEDGEMENTS I wish to thank Dr. Raja Sabapathy for encouraging me to write this paper and for help with the manuscript.Copyright 2006 - Indian Journal of Plastic Surgery The following images related to this document are available:Photo images[pl06011f3.jpg] [pl06011f6.jpg] [pl06011f2.jpg] [pl06011f10.jpg] [pl06011f9.jpg] [pl06011f5.jpg] [pl06011f7.jpg] [pl06011f8.jpg] [pl06011f11.jpg] [pl06011f1.jpg] [pl06011f4.jpg] |
| |||||||||